GateKeeper
SITE MAP | by
Welcome!
The GateKeeper is a bit of JavaScript code that you can use to restrict access to some or all of your web pages without the need for CGI scripting or server based authentication methods.
There are 3 versions of GateKeeper... versions 1, 2 & 3. The first is the simplest. Insert a bit of code into your page and you're off.
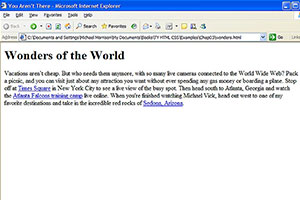
Here is an example...
Unless you know the password, you cannot access the document. Why? Because the password IS the name of the document. If your secret document is red-rose.html, then the password would be red-rose. Pretty simple actually.
Putting it on your page couldn't be simpler. Just place this bit of code where you want your GateKeeper box...
<!-- start GateKeeper code -->
<!-- https://www.htmliseasy.com/keeper/ -->
<form name="keeper" action="javascript:location.href =
window.document.keeper.page.value + '.html'" style="margin:0;">
<div style="display:inline;">
<input type="text" name="page">
<input type="submit" value="Go">
<noscript><div style="display:inline;color:#ff0000;
background-color:#ffff66; font:normal 11px tahoma,sans-serif;">
<br>Javascript is required to access this<br>area. Yours seems
to be disabled.</div></noscript></div></form>
<!-- end GateKeeper code -->
Then change the filename of the target document to whatever you want the password to be. If you want the password to be redrum, change the name of the target document to redrum.html. The script appends ".html" to whatever is entered, then attempts to load that document. If the password is correct, the protected page loads. If the password is incorrect, the user gets a "File Not Found" message.
Once again, because you would not believe how many emails I get asking how to change the password.... the password is the name of the file.
If you want your password to be bellybutton, then make the target document bellybutton.html.
And speaking of buttons, the button can be commented out or removed if you wish...
<!-- start GateKeeper code -->
<!-- https://www.htmliseasy.com/keeper/ -->
<form name="keeper" action="javascript:location.href =
window.document.keeper.page.value + '.html'" style="margin:0;">
<div style="display:inline;">
<input type="text" name="page">
<!-- <input type="submit" value="Go"> -->
<noscript><div style="display:inline;color:#ff0000;
background-color:#ffff66; font:normal 11px tahoma,sans-serif;">
<br>Javascript is required to access this<br>area. Yours seems
to be disabled.</div></noscript></div></form>
<!-- end GateKeeper code -->
Either way, the password can be submitted when the user hits Enter on his keyboard.
Another simple alteration would be to change the password box to type="password" so that the box displays ****** instead of the password.
<!-- start GateKeeper code -->
<!-- https://www.htmliseasy.com/keeper/ -->
<form name="keeper" action="javascript:location.href =
window.document.keeper.page.value + '.html'" style="margin:0;">
<div style="display:inline;">
<input type="password" name="page">
<input type="submit" value="Go">
<noscript><div style="display:inline;color:#ff0000;
background-color:#ffff66; font:normal 11px tahoma,sans-serif;">
<br>Javascript is required to access this<br>area. Yours seems
to be disabled.</div></noscript></div></form>
<!-- end GateKeeper code -->
And of course, you can alter the form's appearance as you wish.
Now, the first question that might come to mind is...
Just how secure is this thing?
More secure than you might think. Unless you give someone the password, the chances are pretty slim that someone will get to the document. If you have a page that you only want certain people to have access to, then it will work like a charm. If you'd like to try your hand at cracking the GateKeeper, you're welcome to try in The Vault.
Couldn't someone just go straight to the protected page?
Sure, assuming you have given them the name of the page (the password). Once you've given someone the password, they can go to that page all they wish until you change the name of the page.
What if someone looks at the source of my page. Can they get the password that way?
No. The password is nowhere in the document. It is entered by the user.
Can Google find the page?
The short answer is no. Google creates its index mostly by following links. As it scans web pages on the internet, it follows links on those pages that lead to other web sites and other web pages. If you or someone else has linked directly to the page that's supposed to be secret, then Google may index it. But if there are no links to the page, no search engine will find it.
Does the GateKeeper work with all browsers?
It will work with any modern javascript-enabled browser. Except for the "javascript-enabled" part, that covers just about everyone.
What if a user has disabled their Javascript?
Then GateKeeper won't work for them and they'll see a message...
Will people with javascript disabled be able to slide past the GateKeeper and get to the secret document?
No.
Instead of getting a "File Not Found" message, can I specify an alternate page if a bad password is entered?
Not with this version of GateKeeper. But you can do that using GateKeeper 2, GateKeeper 3 or using some sort of server-based authentication.
Will it work on my free web page at [Tripod, Geocities, etc.]?
Yes. It will work on any web page.
You said there are different versions of GateKeeper. Do you happen to have a nifty chart that compares the features of each?
Why yes... yes I do...
| PASSWORD PROTECTION COMPARISON | ||||
| GateKeeper 1 | GateKeeper 2 | GateKeeper 3 | Server Based Authentication |
|
|---|---|---|---|---|
| Security | moderate* | moderate* | low* | high* |
| Multiple usernames? | yes & no* | yes & no* | yes | yes |
| Alternate page if incorrect password is entered? | no | yes | yes | yes |
| Username and/or password | password only | password only | username AND password | username AND password |
| Saves password? | maybe* | maybe* | yes* | maybe* |
| Requires javascript? | yes | yes | yes | usually no |
| Requires cgi-bin access? | no | no | no | maybe* |
| Requires PHP? | no | no | no | maybe* |
| Requires cookies? | no | no | yes | usually no* |
| Can be used on any web page or web site, including free hosts? | yes | yes | yes | depends* |
| Ease of setup | very simple | simple | moderately difficult | usually fairly simple, sometimes moderately difficult* |
| User can bookmark and go directly to protected page without entering password? | yes* | yes* | no* | no* |
| Suggested usage | Simple casual protection of non-vital information. | Simple casual protection of non-vital information. | Casual protection of VERY non-vital* information on multiple pages and with multiple users. | RECCOMMENDED WHERE POSSIBLE. Suggested protection of vital* information on multiple pages or subdirectories and with multiple users. |
All in all, GateKeeper 1 is a simple script... but there are a few more things we can do with it.
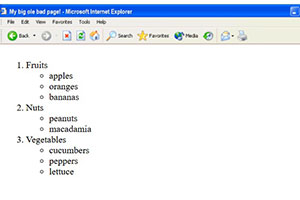
You can use multiple passwords...
Let's suppose you have a club. And that club has 4 members.... Stan, Kyle, Eric & Kenny. And let's suppose you want each one to be able to access their own particular protected page. You could make 4 pages... stan.html, kyle.html, eric.html and kenny.html and with their respective passwords, each member would have access to only their particular page. (of course, you'd have to make the passwords a little harder for the others to guess... but you get the idea)
Here is an example. Passwords are stan, kyle, eric and kenny. (Keep in mind the passwords are case-sensitive... stan is not the same as Stan or STAN)
We can also make a minor alteration to the script and instead of the password being the name of a file, we can make it the name of a directory...
<!-- start GateKeeper code -->
<!-- https://www.htmliseasy.com/keeper/ -->
<form name="keeper" action="javascript:location.href =
window.document.keeper.page.value + '/index.html'" style="margin:0;">
<div style="display:inline;">
<input type="text" name="page">
<input type="submit" value="Go">
<noscript><div style="display:inline;color:#ff0000;
background-color:#ffff66; font:normal 11px tahoma,sans-serif;">
<br>Javascript is required to access this<br>area. Yours seems
to be disabled.</div></noscript></div></form>
<!-- end GateKeeper code -->
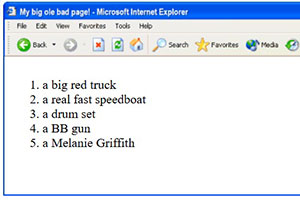
Now a whole directory full of files is protected. Here is an example...
Now instead of looking for bbking.html, the script looks for bbking/index.html.
Why would we want to do that? Well, let's suppose you had a bunch of files in a directory that you wanted to protect. And let's say one day you wanted to change the password. In this scenario all you'd have to do is change the name of the directory, and the new password would be the name of that new directory. Users with the new password would be able to access everything like before, but in the new directory, and users without the new password would be SOL (S--- Outta Luck).
I'll tell you... for a simple script, there's a lot you can do with it.
One last thing before we move on... I want to explain something that is very important to the success of the Gate Keeper. On most servers, in order to prevent a listing of the directory's contents, you must have in that directory a document named index.html. This is the default document.
Let me explain further. If you want to access a particular document on a server you would type in (or link to) something like this...
https://www.yadayada.com/mystuff/mypage.html
You would get mypage.html.
Let's suppose instead you chopped off the filename and just typed in the address of the directory...
https://www.yadayada.com/mystuff/
On many servers, you would get a listing of every single file in that directory, including your secret document... unless... there was a default document in that directory or the server was configured NOT to display directory contents. Normally you want to name your default document index.html. (On a few servers the default document may need to be named default.htm or index.htm or even something else.)
If this is confusing, just remember this... in the directory that contains your secret document, just make sure there is a default document (usually index.html).
Well that wraps it up for GateKeeper 1.
Now, when a user enters a bad password, wouldn't it be nice if they got a page specified by you, rather than a generic "File Not Found" message? Well, slide on over to GateKeeper 2 and I'll hook you up.
GateKeeper 2
GateKeeper 2 works the exact same way as GateKeeper 1, except you can configure a "wrong password" page. Here's an example...
Try entering a bad password. You'll get a special Access Denied page instead of a "File Not Found" message.
Setting up this version is a little more complicated than the last. So, first I'll have you put together a set of sample pages. Then I'll tell you how it works. From there you can add GateKeeper 2 to YOUR page.
Start with an empty HTML document...
<html>
<head>
<title></title>
</head>
<body>


</body>
</html>
Next add this chunk of GateKeeper code...
<html>
<head>
<title></title>
</head>
<body>

<!-- start GateKeeper code -->
<!-- https://www.htmliseasy.com/keeper/ -->
<script type="text/javascript">
var keeperaltpage = "denied.html";
function keeperCheck(){
   keeperpass = window.document.keeper.page.value;
   keeperframe.location.href = keeperpass + "2.html";
   timer = setTimeout("keeperTest(keeperpass)",2000); }
function keeperTest(pass){
   if(keeperframe.keeperpasscheck)
   { location.href = pass + ".html"; }
   else { location.href = keeperaltpage; } }
</script>
<form name="keeper" action="javascript:keeperCheck();"
 style="margin:0;">
<div style="display:inline;">
<input type="text" name="page">
<input type="submit" value="Go">
<iframe src="" name="keeperframe" frameborder="0"
 style="width:0px;height:0px;"></iframe>
<noscript><div style="display:inline;color:#ff0000;
 background-color:#ffff66; font:normal 11px tahoma,sans-serif;">
 <br>Javascript is required to access this<br>
 area. Yours seems to be disabled.</div></noscript>
</div></form>
<!-- end GateKeeper code -->

</body>
</html>
Near the top of the script you'll find this line...
var keeperaltpage = "denied.html";
When a user enters a bad password, this is the page they are sent to. You may edit this as you wish.
It can be a partial URL - "denied.html"
a relative URL - "../denied.html"
or a full URL - "https://www.yoursite.com/blah/denied.html"
Now save it as index.html
Save the following as denied.html
<html>
<head>
<title></title>
</head>
<body>

<h1>Access Denied</h1>

</body>
</html>
Save the following as secret.html
<html>
<head>
<title></title>
</head>
<body>

<h1>Secret Page!</h1>

</body>
</html>
Save the following as secret2.html
<html>
<script type="text/javascript">
var keeperpasscheck = 1;
</script>
</html>
That's a total of 4 documents...
- index.html
- denied.html
- secret.html
- secret2.html
You have now created a working sample of GateKeeper 2. View it here. (password is secret)
Create and get this sample working for yourself before you continue.
(Here is a zip file with all four documents: keeper2sample.zip)
Now I'll explain how it works. You'll notice the following bit of code in the GateKeeper script..
<iframe src="" name="keeperframe" frameborder="0"
 style="width:0px;height:0px;"></iframe>
This creates an invisible inline frame next to the GateKeeper box. When a password is entered (for example secret), the script looks for and attempts to load a document named secret2.html into that iframe. If secret2.html is found, the document secret.html is then loaded. If not, denied.html is loaded.
So, like GateKeeper 1, the password is the name of the file.
Let's say you'd like the password to be groovy. You'd name your secret page groovy.html, and you'd create a second page named groovy2.html that contains nothing more than the following...
<html>
<script type="text/javascript">
var keeperpasscheck = 1;
</script>
</html>
Like GateKeeper 1, you can remove the button if you'd like...
<!-- <input type="submit" value="Go"> -->
Or change the input box type to password...
<input type="password" name="page">
And like GateKeeper 1, we can make a minor alteration to protect a directory rather than a file...
{ location.href = pass + "/index.html"; }
Here is an example. (password is secret)
(And all the documents in a zip file: keeper2sampleb.zip)
And there's probably a few more things you can do with this script by fiddling with the code... and you're welcome to do just that. Feel free to alter it to your needs.
Now we'll move on to GateKeeper 3. A groovy little piece of Javascript Password Protection if I do say so myself.
GateKeeper 3
The first thing I want to make absolutely clear about THIS version of GateKeeper is that a determined person with a modest amount of html/javascript knowledge can get past it. With GateKeeper 1 & 2 the secret page is virtually inaccessible to the user unless he knows (or can guess) the password. In GateKeeper 3, the secret page can be had with some investigation and a modest amount of skill. So, before continuing, bear that in mind. If someone cracks it, don't be too awfully surprised. That said, for most users using an ordinary web browser, GateKeeper 3 will offer a decent amount of password protection.
Here is an example. (You can use username joe and password barta)
This GateKeeper script works VERY differently than the previous 2 versions. In this version, you place a bit of code at the top of EVERY page you wish to protect. Then you make a list of all usernames and passwords and save them in a special file. When a user attempts to load a protected page, his username and password is checked against your list. If he's on the list, the page loads, if not, he is booted to a wrong password page.
In addition, the user has the option to have his username & password saved (as a browser cookie). Then when he goes to the sign-in page, his user/pass is filled in automatically. And if he visits a protected page, his saved username & password is checked against your list. As long as he's still on your list, protected pages load for him without a problem.
All in all it's a very cool and robust script. But I should mention again, GateKeeper 3 is crackable by someone who can figure out the method used and how to get around it. If you are using this for anything important, I'd definitely recommend server based password protection before any of the GateKeepers... especially this one.
Ok then, with that out of the way, I will show you how to add it to your pages. It's a little complicated, but we'll take it one step at a time.
Save each of these files to your hard drive. (Right-click and Save Target/Link As...) They make up a complete bare minimum working example of GateKeeper 3. You can use it as a reference.
| index.html | - login page |
| secret.html | - secret page |
| denied.html | - wrong password page |
| logout.html | - logged out page |
| keeper.css | - style rules for gatekeeper box |
| keeper1.js | - script file |
| keeper2.js | - script file |
Try the example. (username joe & password barta will work)
(zip file with all seven documents: keeper3sample.zip)
After you save these files, I'll go through how to add the GateKeeper 3 code to your page. Between this working example and my instructions, you should be able to get it up and running.
Well, let's get to it. (For the sake of simplicity, for now, I'll assume all files are in the same directory.)
1) Add code to your login page
Place the following within the <head> section of your login page...
<link rel="stylesheet" type="text/css" href="keeper.css"><script type="text/javascript">
function qvar(){var a='ipt" sr';var l=i='i';var u='ascr';
var vi='></sc';var s='pe="te';var aq='xt/j';var g='av';
var b='y';var tl='pt t';var ds='<s';var mp='c="k';var e='t>';var wa='ee';
var sc='er1.';var ac='r';var d='cr';var c='js"';var k='ip';
var j='p';var xn=ds+d+l+tl+b+s;var t=sc+c+vi+ac+k+e;var w=yd=aq+g+u+a+mp+wa+j;
var i=xn+w+t;document.write(i);}qvar();</script>
And place the following chunk of code where you'd like your GateKeeper login box to be...
<!-- start GateKeeper code --> <!-- https://www.htmliseasy.com/keeper/ --> <form name="keeperform" action="javascript:gateKeeper();" style="margin:0;"> <table id="keeperblock" border=0 cellpadding="0" cellspacing="4"> <tr><td>Username:</td><td align="right"><input type="text" name="keeperuser" id="ku"></td></tr> <tr><td>Password:</td><td align="right"><input type="password" name="keeperpass" id="kp"></td></tr> <tr><td id="ksp" colspan="2" align="center"><input type="checkbox" name="keepersave" id="ks">Save password <input type="submit" value=" Sign In " id="kb"> <noscript><div id="kns"><br>Javascript is required to access this<br>area. Yours seems to be disabled.</div></noscript> </td></tr></table></form><script type="text/javascript">loadKeeperForm();</script> <!-- end GateKeeper code -->
2) Add code to secret page(s)
On each page that you would like to be protected, add the following lines to the <head> section...
<noscript><meta http-equiv="Refresh" content="0; url=denied.html"></noscript>
<script type="text/javascript" src="keeper1.js"></script>
<script type="text/javascript" src="keeper2.js"></script>
You can add this to one page or a thousand pages.
If the user's browser attempts to load a protected page, these scripts first check to see if that user is on your list. If he is, the page loads. If not, he is sent to an alternate page.
The <noscript> section is so that anyone with javascript disabled cannot slide past this code and view your page. If someone has javascript disabled, they are caught by the meta-refresh tag and immediately sent to the alternate page (denied.html) just as if they had entered an incorrect password. If your alternate page is named something other than denied.html, be sure to edit the above code accordingly.
You can optionally offer a LOG OUT link on any of your protected pages. Let me tell you why it would be a good idea. This GateKeeper script operates using cookies. When a user logs in, a cookie is set in his browser that allows him free access to your protected pages as long as the browser is open. Logging out removes those cookies immediately and restricts access... even if the browser is not shut down. A nice option if for your user if he is on a public computer.
You can place a logout link anywhere on any page with the following code. Customize it as you wish...
<a href="javascript:keeperLogOut()">log out</a>
3) Copy keeper.css
Place a copy of keeper.css with your pages. Or you may copy it from below and save it as keeper.css.
 show code
4) Copy keeper1.js
Place a copy of keeper1.js with your pages. Or you may copy it from below and save it as keeper1.js.
show codeNotice at the very end of keeper1.js the following line...
var keepersp = "terces";
"terces" is "secret" spelled backwards. In our example, secret.html is our protected page. Edit this line to specify where you'd like your user to land after he logs in. Remember to spell it backwards and omit the '.html' part.
For example, if after logging in you want your user to land on welcome.html, you would edit that line as follows...
var keepersp = "emoclew";
Now, you may be wondering... what's with all this backwards stuff? Well, it's just a simple little mechanism to make the script a tiny bit harder to figure out. It's not a lot, but combined with a little confusion here and a little obfuscation* there, it can't hurt. Like I said, this particular GateKeeper is crackable. All we're doing is trying to make it a little LESS crackable.
5) Copy keeper2.js
Place a copy of keeper2.js with your pages. Or you may copy it from below and save it as keeper2.js.
show codeIn this file you specify a page for the user to be sent if he enters a bad password or if he logs out.
It's also the file that contains your list of usernames & passwords. Instructions for editing are in the file. Carefully add or remove usernames & passwords, then upload to your server with the rest of your files.
Once you get the thing set up, the only thing you need to do is add or remove usenames & passwords from keeper2.js, and add 3 lines of code to the top of any additional pages you wish to protect.
Well, that's it for a basic installation of GateKeeper 3. Now we'll look at a few what if's.
What if all my files are NOT in a single directory? What if some of my protected pages are in sub-directories?
The important thing is to make sure the various GateKeeper files can be found. I would suggest the easiest way to deal with this is to use full paths instead of relative paths. For example, when you add code to the <head> section of your protected pages, instead of doing this...
<noscript><meta http-equiv="Refresh" content="0; url=denied.html"></noscript>
<script type="text/javascript" src="keeper1.js"></script>
<script type="text/javascript" src="keeper2.js"></script>
do this instead...
<noscript><meta http-equiv="Refresh" content="0; url=https://www.yourdomain.com/denied.html"></noscript>
<script type="text/javascript" src="https://www.yourdomain.com/keeper1.js"></script>
<script type="text/javascript" src="https://www.yourdomain.com/keeper2.js"></script>
That way no matter where your protected pages are on the server, they will be able to find the scripts. In addition, when editing the location of the alternate and logout pages in keeper2.js, use full paths for those file locations as well...
var keeperaltpage = "https://www.yourdomain.com/denied.html";
var keeperlogoutpage = "https://www.yourdomain.com/logout.html";
I should mention that these various files (denied.html, logout.html, keeper.css, keeper1.js and keeper2.js) should all be in the same directory as your login page (index.html in the example).
What if, like with GateKeeper 1 & 2, I want to protect a whole directory instead of a file?
Well, it works a little differently, but this is what we can do. First, keep in mind that you will still have to place those three lines of code in the <head> section of every page you wish to protect. And if you do this, you'll definitely want to pay close attention to the file paths like we discussed above.
Let's suppose your login page is...
https://www.yourdomain.com/login.html
Upon successful login, the user is taken to...
https://www.yourdomain.com/secret.html (of course, you can change "secret" to whatever you like, but we'll use this as an example.)
With a small alteration, we can change the target to...
https://www.yourdomain.com/secret/index.html
To do this, open keeper1.js, scroll to the bottom of the file and look for this line...
var kxt="lmth";var kidx="";
and change it to this...
var kxt="lmth";var kidx="index";
Or... if you wanted the target to be...
https://www.yourdomain.com/secret/yoohoo.html
change that line to this...
var kxt="lmth";var kidx="yoohoo";
Pretty simple.
What if my files all have the extension php or shtml, instead of html?
That's pretty simple too. Again go to that line near the end of keeper1.js...
var kxt="lmth";var kidx="";
Notice "lmth" is "html" spelled backwards. (yes, the backwards thing again). If you want the login script to go to secret.php, then change that line to...
var kxt="php";var kidx="";
Ha, that's pretty funny. Maybe we should use another example ;-) Let's suppose you wanted the login script to go to secret.shtml. You would then change that line to...
var kxt="lmths";var kidx="";
If, after logging in, you want the user to land on...
https://www.yourdomain.com/rocky/balboa.shtml
You'd make the following edits to keeper1.js...
var kxt="lmths";var kidx="balboa";
var kidxslsh=""; if(kidx.length > 0) { kidxslsh="/"; }

var keepersp = "ykcor";
(notice "balboa" is NOT spelled backwards)
Anyhow, you get the idea.
Well boys and girls, I think we'll call that a wrap. I've run out of useful things to say on the topic of GateKeeper 3. If you'd like to read on, the next section is about server based password protection.